Here is my copic reveal for the month of MAY over at Savvy n Sassy!! Remember, you can still get into the Copic Club if you're interested...it's a GREAT deal on markers!!!
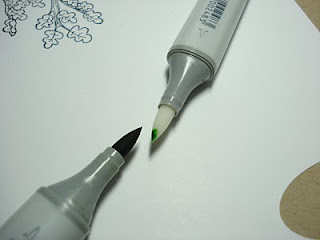
Tip-to-Tip blending - this one is EASY - but these are gonna get harder....so lets start practicing!! :)
Tip-to-Tip Blending (select parts taken from the Copic Manual)
This technique really demonstrates one of the unique properties of Copic Ink. Tip-to-tip blending is good for long, very skinny areas like flower stems, where you wouldn't have enough room to get a blend using one of the other techniques. Works for any color combination, though it's easiest to learn with a light color and a dark color. In tole painting this technique would be similar to "loading your brush".
1. Use your light color as your "brush". Carefully add a bit of the dark color to the tip. This is the trickiest part of this technique as it is hard to figure out if you have applied too much or too little ink.
2. Start from the dark side of your object, and in one long stroke pull your brush across the shape. your dark color should gradually fade into your light color. If you need to darken or add more color apply in the same way. In the same direction.
This technique will not contaminate the tip of the other marker. If you are working with the colorless blender you can also pull ink directly from the dirty barrel of the colored marker. There's tons of ink all over the edges of this marker. Using the tip-to-tip technique takes care of this messy situation as you just color right from the barrel instead of the tip resulting in less waste of ink.
You can also use the tip-to-tip blending technique on the cheeks in your images using R20 or some similar color. This really softens up the image as you are adding color and blending at the same time. You don't tend to get those harsh lines that way.
In my sample - I used the tip-to-tip method on my stem. You can see how the stem is darker on the top closest to the flower and almost fades to white as I went down the stem. I also used the tip-to-tip technique on the flowers, starting with using darker orange on one of my yellow markers.
Also, I use the tip-to-tip technique when I don't have a particular color that I want between two shades. For example, on my little gal's boots, I didn't have one of the 0000 images to blend with, so I used the tip-to-tip technique with my blender pen and a darker copic to blend a lighter shade when fading to the lighter color. By the way, if you note the bling on the bottom of this card - the bling was a gift in a goodie bag that I received and the gal had mentioned she bought it at the dollor store. It was just plain clear rhinestones when I got it and I used my copics to color it to match my card!! Fun eh??
In my third image I used the tip-to-tip technique to again blend in a lighter color. This is really evident on the socks and on the top portion of her dress. It just works really well in situations where you might not have the perfect "in-between" color.
So let's see what you can come up with....leave a comment with a link to your blog and I'll be sure to check it out!!! Happy coloring - thanks for stopping by!! :)


No comments:
Post a Comment